You have created a nice collection of custom worlds and would like to make this collection easily available to students. The most convenient way for students is to host the worlds on a publicly available website (like Github or your own website) and create custom menus. However, before explaining how to do this, let’s explore the various ways that worlds can be loaded.
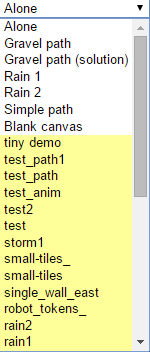
Default worlds are shown with a white background. Worlds created locally, and saved in the browser’s local storage, have a colored background.
Reeborg’s World includes a few worlds by default. Previously, the worlds included were closely tied to a tutorial written to teach Python. More recently, the worlds included are chosen because they demonstrate a specific feature, which is usually referenced somewhere like in this documentation or on a blogpost.
The default worlds are selected from an html select element located at the top of the browser.
Note
World creation and edition is adressed elsewhere in this documentation.
When you create a new world (or edit an existing one), you are offered the option to automatically save it in your browser’s local storage. Once a world is saved, it is appended in the default world selection. While the names of the default worlds are shown with a white background, worlds saved in a browser are displayed with a coloured background.
It is also possible to save worlds in a file; the format used is json. For convenience of the programmer wishing to look at the resulting files, some additional spaces are inserted which makes it easier to understand the file contents, and possibly edit it.
In addition to save the world configuration, it is possible to save the content of the editor, the library as well as the programming language used. [It is also possible to change the user interface at the same time Changing the User Interface.] All this information is encoded in a permalink that can be used as a url in an hyperlink.
For example, this permalink will load a custom world and solution.
Using permalinks as hyperlinks can be very effective for tutorial writers. However, there are two main drawbacks to using them in this way:
Note
Permalinks can also be loaded using the html select. See Gravel path (solution) for an example.
One way around this is to copy the content of the permalink (on Windows, this is done by right-clicking on the link and choosing the appropriate option), use the advanced menu option in Reeborg’s World to replace the current permalink by the new content and update the site appropriately. If you wish, you can try to do so with the example given above.
Instead of clicking on the html select element at the top of the page for Reeborg’s World, one can load a world using the World() function in a program. This can be very useful in some cases. For example, suppose you want to have a single program be a solution for the worlds “Rain 1” and “Rain 2”. A good way to do this is to insert at the top of the program the following two lines:
#World("Rain 1")
#World("Rain 2")
...
By uncommenting the appropriate one, upon executing the program, the world selection will change to the appropriate world (and end the program’s execution) if the world was not already selected. If the world was selected (perhaps after having run the program once), then the World() function call will be ignored and the rest of the program will be executed as is.
Note
If you are using the French version of the site, the corresponding function is called Monde().
Note that this will work whether the selection is simply for a “world” or if if it is for a permalink; however, in the latter case, the editor’s content will be replaced by the relevant content from the permalink. For example, try executing the following one-line program:
World("Gravel path (solution)")
Notice how the html select has been changed after running this program and how the editor now contains a “solution” to this task. This also works for worlds that you create and that are saved in the browser - provided you use names that are different from the default worlds. If you use a name identical to one from the pre-defined worlds, you can still access it in a program by writing user_world: before the name of your world as follows:
World("user_world:My World")
Note that only the world content (and not that of the editor or the library) is affected here.
There is another way in which World() can be used; this is probably the most useful way.
Suppose you have saved a world file, or a permalink (in a file) on a publicly accessible website. You can load the relevant world (or permalink) using:
World(full_url)
As a concrete example, you can try:
World("http://personnel.usainteanne.ca/aroberge/reeborg/test_sokoban1")
Important
Loading files from external servers is done using a third-party server (cors-anywhere.herokuapp.com) that enables Cross-origin resource sharing. I have noticed on at least one occasion that this service was unavailable for a few minutes.
